
Tokyo has no shortage of mountains within easy train reach. Most of them, however, give you just one thing: a summit, a view, or a temple. Of every day hike within two hours of Tokyo, Mt. Mitake to Mt. Odake packs the most variety into a single day: a working mountain shrine with 2,000 years of history, a moss-covered boulder garden threaded by a clear stream, quiet waterfalls, and a sharp, rocky summit with one of the finest Fuji views in the Okutama mountains.
You will start the morning riding one of the steepest cable cars in the Kanto region, walk through a centuries-old temple lodging village, and stand before a shrine guarded by a wolf deity. By midday you will be picking your way across wet moss and stepping stones in the famous Rock Garden. And if the sky cooperates, you will finish the afternoon watching Mt. Fuji float above layer after layer of blue ridges. Few day hikes anywhere deliver that much contrast.
If you have already done the popular Mount Takao day hike and want something wilder, this is your next step. Consider this your field manual for Mt. Mitake to Mt. Odake: every step of the route, three ways back down, and the insider details most guides skip.
🥾 Mount Mitake to Mount Odake Day Hike: Quick Summary
Everything from the guide below, condensed — plus a few things most guides skip.
📊 Hike Summary
Distance
~10–11 km round trip (Rock Garden loop)
Elevation gain
~860–910 m (summits 929 m / 1,266 m)
Time
5.5–6.5 hrs standard pace
Difficulty
Moderate🚌 Getting There
JR Chuo Line from Shinjuku to Ome (75 min), Ome Line to Mitake Station (20 min), bus to Cable-shita (10 min), then the Mitake cable car up — about two hours door to trailhead, and the classic route covers Mt. Mitake to Mt. Odake and back in a single day.
- On holidays, look for direct “Holiday Rapid Okutama” trains from Shinjuku — no transfer needed.
- The Mitake cable car climbs 424 m in about 6 minutes. The fare is roughly ¥600 one-way and around ¥1,130–1,200 round trip, and hours run roughly 7:30–18:30 with seasonal variation — confirm both on the official site before you go.
- Driving? Parking near Takimoto costs roughly ¥1,500 on weekdays and ¥2,000 on weekends.
- Aim for the first car up (around 7:30) on autumn weekends — queues get long. And know the last car down before you start walking.
- Budget tip for the return: skip the bus and walk back to Mitake Station along the Tama River — about an hour on foot, and a lovely cool-down.
🧭 Choose Your Trail
Rock Garden Round Trip
The classic Mt. Mitake to Mt. Odake out-and-back via the mossy Rock Garden: about 10–11 km of shrine, forest, and summit.
Direct Out-and-Back
Skip the Rock Garden and head straight for Odake: around 9 km, about 5 hours, and the fastest Fuji fix.
Nokogiri Traverse to Okutama
Continue past Odake down the Nokogiri ridge to Okutama Station: about 3 extra hours of ladders and chains, finishing at the Moegi-no-Yu hot spring.
Short on time? Take the direct route. Here for the full experience? The Rock Garden loop is the one locals recommend — don’t skip it to save an hour. And only add the Nokogiri traverse with an early start, dry weather, and a headlamp in your pack: it’s a proper mountain ridge, not a nature walk.
📅 When to Hike
🌤️ Weather Check
🎒 What to Pack
💡 Good to Know Before You Go
Elevation
1,266 m
Location
Okutama Town & Hinohara Village, Tokyo
Belongs to
Chichibu-Tama-Kai National ParkTable of Contents
- Step 1: Reaching Mitake Station from Tokyo
- Step 2: Cable Car or the Climb on Foot
- Step 3: Oshi Village and Musashi-Mitake Shrine
- Step 4: Nagao-daira, Tengu Rock and the Rock Garden
- Step 5: The Mt Odake Trail and the Summit
- Step 6: Three Ways Back Down
- Hidden Answers: What Most Guides Don't Tell You
- When to Hike: Season by Season
- What to Pack (and What to Leave)
- Safety Guidelines
- A Final Word
Step 1: Reaching Mitake Station from Tokyo
Most hikers begin Mt. Mitake to Mt. Odake at Shinjuku Station, and honestly the rail journey is half the adventure. First, take the JR Chuo Line west to Ome — about 75 minutes. Next, transfer to the JR Ome Line for the final 20 minutes to Mitake Station. All told, budget 1.5 to 2 hours door to trailhead, and around ¥920–950 one way.
A few logistics make the morning smoother. Your Suica or Pasmo IC card works the entire way, so skip the ticket machines. Meanwhile, note that some Chuo Line trains require a change at Tachikawa — check the departure boards. On holidays, however, keep an eye out for the direct "Holiday Rapid Okutama" services, which run straight from Shinjuku with no transfer at all.
Above all, leave early. To start walking by 9:00, you should leave Shinjuku around 6:00–6:30. As a result, you will arrive before the cable car queues build and reach the summit with the whole afternoon still ahead of you. This is an Okutama day hike from Tokyo that rewards the early bird more than most.
Step 2: Cable Car or the Climb on Foot
However you climb, the Mt. Mitake to Mt. Odake day officially begins at Takimoto, the cable car's lower station. From Mitake Station, a bus runs to "Cable-shita" in about 10 minutes for roughly ¥290. Then it's a short but steep uphill walk to Takimoto at 407 m.
The Mitake cable car itself is an experience: it climbs 424 m to Mitakesan Station (831 m) in just 6 minutes, on the steepest average gradient of any cable car in the Kanto region. The fare is roughly ¥600 one-way and around ¥1,130–1,200 round trip — but prices have shifted recently, so confirm the current fare on the official site before you go. Hours run roughly 7:30–18:30 with seasonal variation, so check the timetable too. Fun detail: dogs can ride as well, for a pet fare.
On the other hand, you can walk up instead. The classic on-foot route from JR Mitake Station takes about 90 minutes via the footbridge over the Tama River, while a forest-road shortcut from the bus stop area takes roughly 50 minutes. These are different sub-routes, so don't treat either number as definitive. For example, skipping the cable car "to save money" is one of the most common beginner mistakes — it burns two hours of energy on dull uphill before the real hike even starts.
Step 3: Oshi Village and Musashi-Mitake Shrine
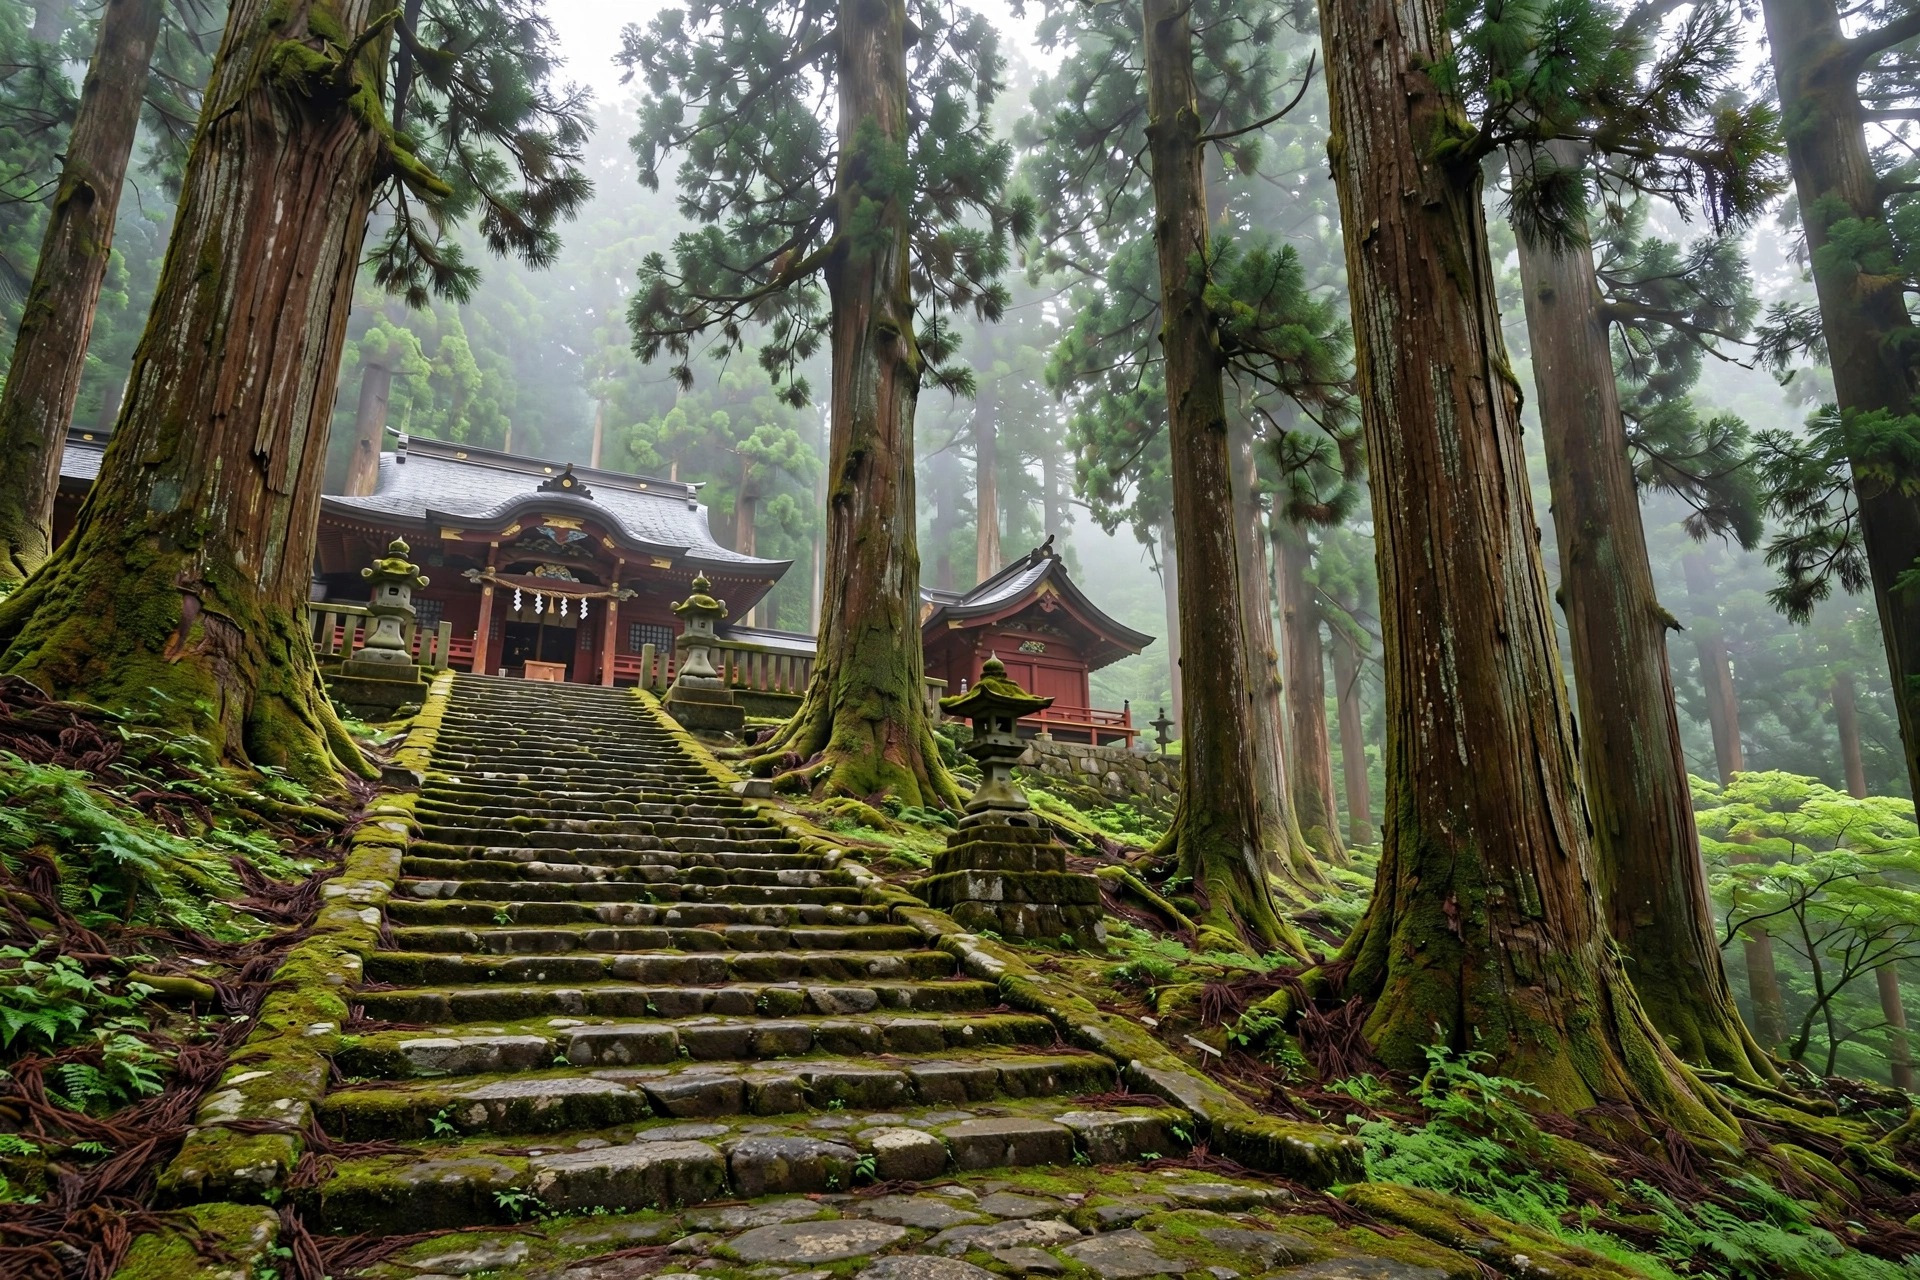
The first hour of Mt. Mitake to Mt. Odake is cultural, not cardio — so slow down and treat it like a temple visit that happens to sit on a mountain. Step out of the cable car's upper station and you are immediately at Mitake-daira, an open plaza with an observation deck over the Kanto Plain. On clear days you can pick out the Shinjuku skyscrapers and the Tokyo Skytree.
Next comes the oshi village, a remarkably preserved settlement of shukubo temple lodgings, soba restaurants, and souvenir shops. An overnight stay runs around ¥10,000–12,000 per person with dinner and breakfast — worth considering for a two-day trip. Before leaving the village, stop at the Mitake Visitor Center for a free detailed hiking map. Note, however, that it is closed on Mondays, so have a backup plan (more on that in the hidden-answers section).
Continue past the Jindai Zelkova — a roughly 1,000-year-old tree designated a national natural monument — and through the old Zuishinmon gate, where the stone stairs begin. They lead to Musashi-Mitake Shrine at Mt. Mitake's 929 m summit: a site of mountain worship going back some 2,000 years, in its present form traditionally dated to 736, when the monk Gyoki enshrined Zao Gongen here. Its deity is a wolf, Ōkuchimagami — "Oinusama" — who legend says guided Prince Yamato Takeru through these very mountains. The shrine is also famously dog-friendly, offering pet blessings and dog charms. If you want the full backstory on this peak alone, our Mount Mitake hike guide goes deeper.
Step 4: Nagao-daira, Tengu Rock and the Rock Garden

Head out behind the shrine toward Nagao-daira, an open plateau with another fine viewpoint. Just beyond it you will pass a stream with a natural water source — useful in a pinch, though carrying your own water is the safer plan. From here, the day changes character completely: the paved approach gives way to real forest trail.
First comes Tengu Rock, a sacred boulder with a chain for scrambling to the top, where a small tengu statue sits. Nearby, Nanayo Falls drops down a steep staircase — and yes, you will climb back up it. Then the trail delivers its centerpiece: the Mitake Rock Garden course, about 1.5 km of moss-covered boulders threaded by a clear stream, running all the way to Ayahiro Falls.
The Mitake Rock Garden course is the scenic heart of Mt. Mitake to Mt. Odake — and the section you will photograph most. Dappled light filters through the canopy, stepping stones cross the stream, and everything is upholstered in green moss. It is at its best in fresh summer green or autumn foliage, and its nickname "Tokyo's Oirase" is well earned. It is also, however, the slipperiest stretch of the day: wet moss and fallen leaves hide slick stone and roots, so slow right down here, especially after rain.
"Tokyo's Oirase" is no exaggeration — the Rock Garden is the prettiest kilometre of trail within two hours of Shinjuku. It is also the one most likely to put you on your backside. Tread softly.
Step 5: The Mt Odake Trail and the Summit
The Rock Garden ends at Ayahiro Falls, a thin waterfall of about 30 m with a torii gate standing before its basin. The shrine still uses this spot for rituals, so keep your voice down — it is a working sacred site, not just a photo stop. There is a toilet just above the falls, the last reliable one before the summit push. From here, climb to the Akuta-ba Pass junction and on to the ridge proper: the quietest part of the day, with fewer people and deeper forest.
Past the Nabewari junction — the fork toward Mt. Nabewari, which matters for the return — the Mt Odake trail turns properly steep and rocky. Short chain-assisted sections guard the final pitches: face the rock, keep three points of contact, and let other hikers finish before you start. From this point on, Mt. Mitake to Mt. Odake finally feels like a proper mountain day.
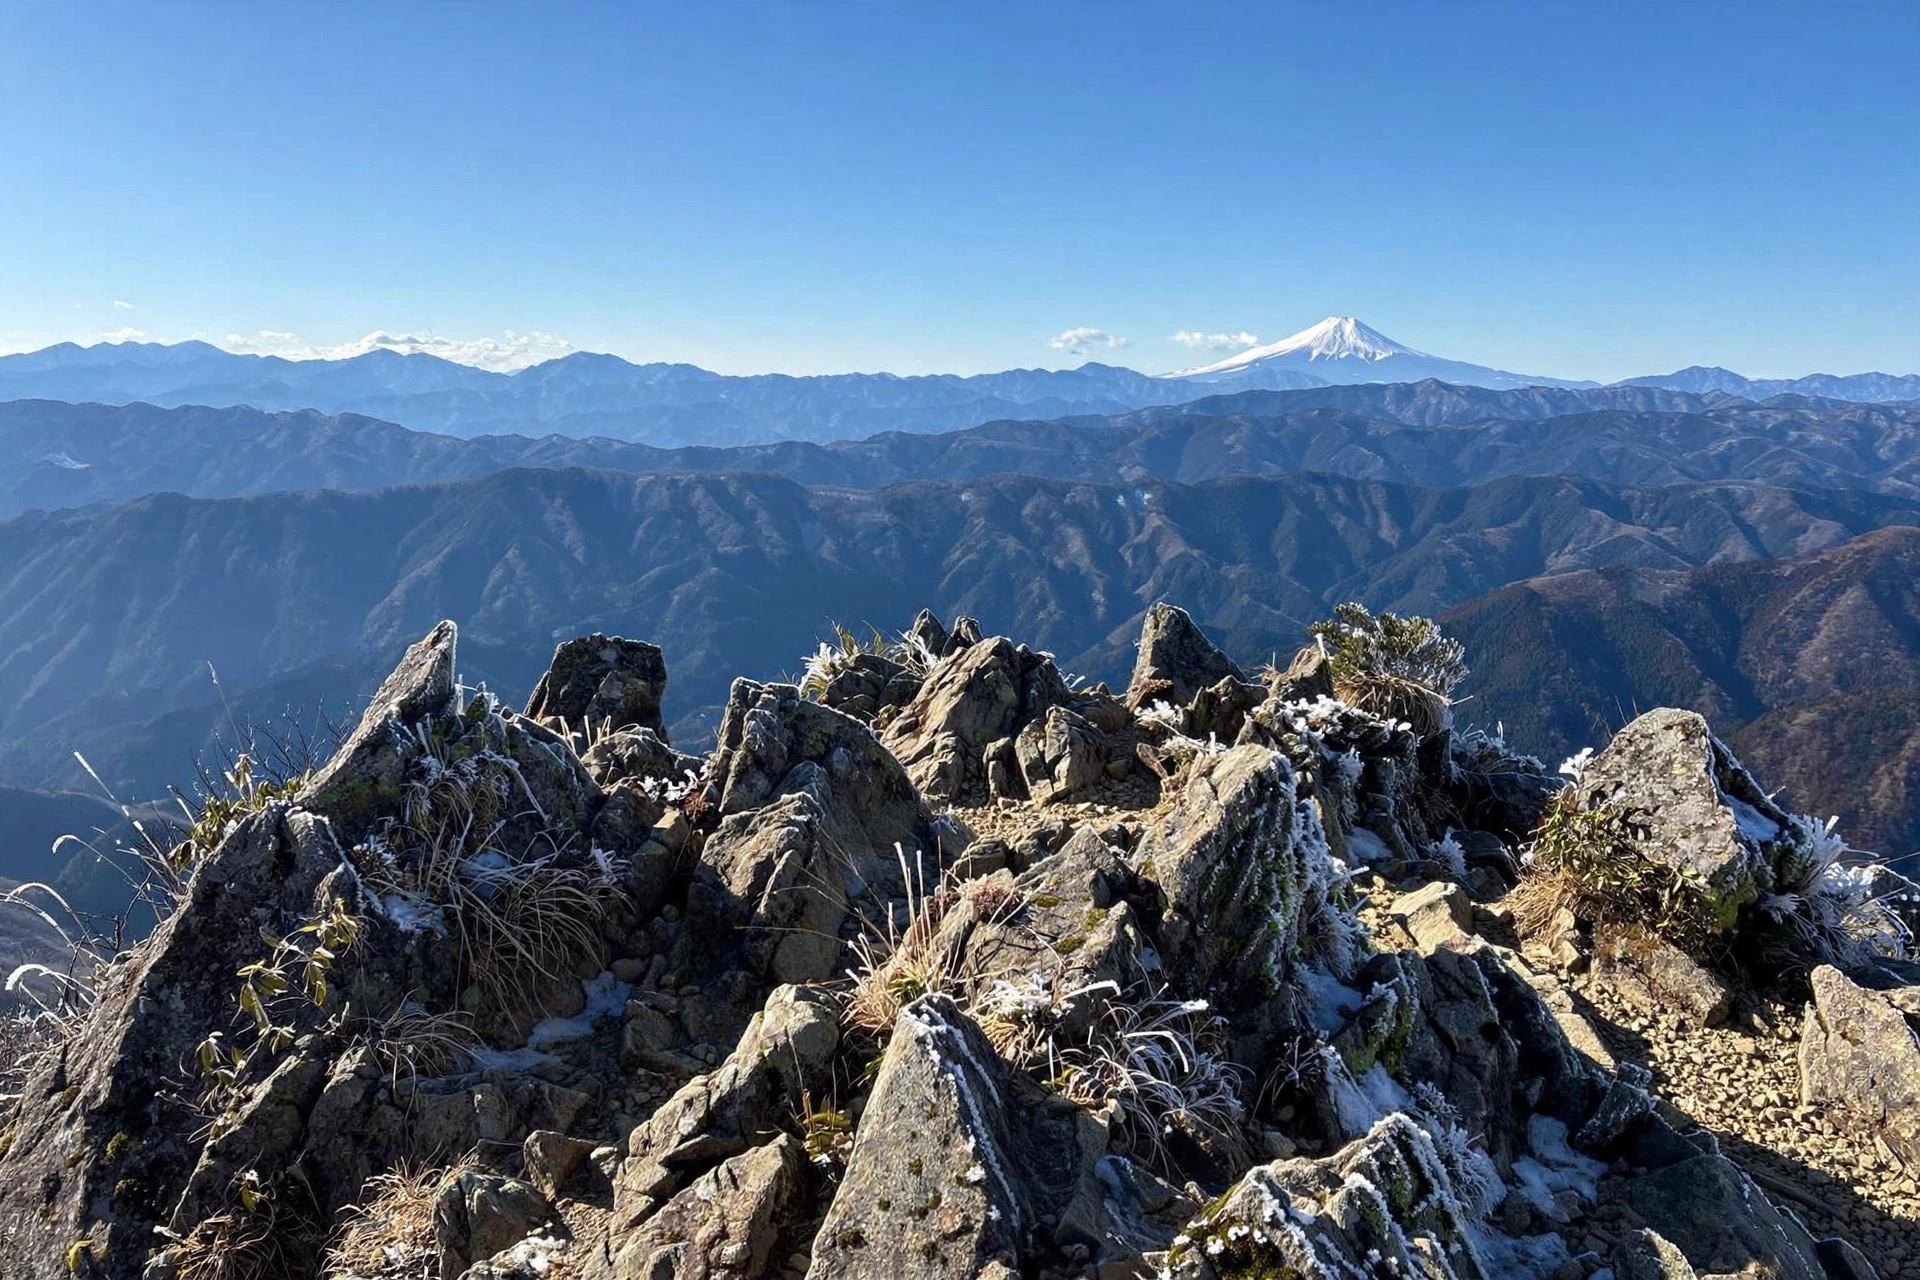
Then the trees break, and you are standing on Odake's pointed summit at 1,266 m, marked by a triangulation point and the inner shrine of Daitake Shrine. One warning: the Ōdake-sansō hut nearby has been closed since 2008 and is now derelict, so don't count on it for shelter or food. The real reward is the view. The Mt Fuji view from Odake is the day's payoff — on clear days Fuji dominates the western horizon, with the Kanto Plain and Tokyo skyline to the east and the Tanzawa range to the south. Winter mornings give the best odds, so aim to summit before noon; afternoon clouds are common. (From the nearby Okunoin-mine ridge you can also spot Mt. Tsukuba.) For this peak on its own terms, see our Mount Odake hike guide.
Arrive at the summit before noon. Fuji belongs to the morning here — by mid-afternoon, the clouds usually win.
Step 6: Three Ways Back Down
For the return leg of Mt. Mitake to Mt. Odake you have three genuine options — and the right choice depends on your legs, the clock, and the weather. Each one is worth understanding before you commit at the summit.
Option 1: Retrace Your Steps
The simplest choice is also the most popular: turn around and walk back the way you came. For reference, Mitake to Odake hiking time on the published course-time figures is about 2 hours up and 1 hour 55 minutes down between the two peaks, and the full return from Odake to the cable car's upper station takes just under 2 hours at standard pace. You already know the tricky spots, the Rock Garden looks completely different in reverse light, and you will be back at the cable car with the least navigation risk. If in doubt, take this option.
Option 2: The Nabewari Partial Loop
For different scenery without extra risk, take the partial loop. From the Nabewari junction, swing past Mt. Nabewari and along the Okunoin-mine ridge, then drop back to Nagao-daira. The full loop runs about 10.6 km in roughly 6 hours 25 minutes at standard pace. As a bonus, the Okunoin-mine ridge opens up views of Mt. Tsukuba and even the Tokyo Skytree — angles you never see on the out-and-back. This is the sweet spot for hikers who want variety but started too late for the full traverse.
Option 3: The Nokogiri Traverse to Okutama
The ambitious option continues from Odake down the Nokogiri ridge, crossing Mt. Nokogiri (1,109 m) all the way to Okutama Station. It adds about 3 hours of walking on a fully unpaved ridge with ladders and chain sections — a known tricky stretch. The payoff is real, though: you finish near the Moegi-no-Yu natural hot spring, the perfect end to a long day. However, this is strictly an early-start, dry-weather, headlamp-in-the-pack undertaking. Never attempt it in or after rain, and never with a late start.
Hidden Answers: What Most Guides Don't Tell You
Here is a hidden answer that changes Mt. Mitake to Mt. Odake for photographers: the Rock Garden faces east. Morning light pours through the canopy and turns the moss electric green; by mid-afternoon the gorge sits in flat shadow. In other words, the classic advice to "take your time at the shrine" costs you the best light of the day. See the shrine, but keep moving — the Rock Garden before 10:00 is a different place.
Similarly, few guides mention the Monday problem. The Mitake Visitor Center — source of the excellent free hiking map — is closed on Mondays. If your hike falls on a Monday, download an offline map (YAMAP is the standard in Japan) the night before. The Rock Garden junctions confuse even experienced hikers, and some signs are Japanese-only.
A few more insider notes. First, the walk back along the Tama River from the cable car area to Mitake Station takes about an hour — it saves the bus fare and makes a lovely cool-down after a long day. Second, eat your soba in the oshi village before the long stretch: there is almost nothing to buy between the shrine and Odake. Third, winter hides a secret highlight — rime ice frosting the trees around Odake's summit on freezing mornings, a sight most autumn-focused guides never mention. Finally, on autumn weekends, either catch the first cable car around 7:30 or accept long queues; a weekday hike is a different, quieter mountain.
The mountain rewards the early: first cable car up, Fuji before noon, and the Rock Garden all to yourself. Everything good about this hike happens before lunch.
When to Hike: Season by Season
Autumn is when Mt. Mitake to Mt. Odake shows off. Foliage peaks in early to mid-November, and the Rock Garden at its red-and-gold best is the signature view of the whole Okutama area. A "Momiji Festival in the Sky" runs during the season — though dates change yearly, so check before you go. Higher elevations turn color first, so the summit ridge can peak a week or more before the gorge.
Spring, from April to May, is the gentle alternative: fresh green, mild temperatures, and far smaller crowds. Summer, meanwhile, offers a genuinely cool escape from Tokyo's heat — but it comes with trade-offs. Afternoon thunderstorms build fast over the ridge, mosquitoes own the Rock Garden, and heatstroke is a real risk, so start early and hydrate constantly. A bear bell is a sensible precaution too.
Winter is the connoisseur's pick. Cold, clear air delivers the best Fuji visibility of the year, and rime ice coats the summit trees on freezing mornings. The catch is ice: rocks in the Rock Garden and around the summit freeze into genuine hazards — a January 2026 trip log reported multiple frozen patches and one slip on black ice. Light crampons are strongly recommended, and plan to finish well before sunset, since the dense forest darkens early.
What to Pack (and What to Leave)
Everything you need for Mt. Mitake to Mt. Odake fits in a daypack — but almost nothing on the trail can be bought past the shrine, so pack like it. Start with the non-negotiable: sturdy hiking boots with good grip. Not sneakers, not trail runners with worn tread. Nearly every trip report stresses this, because moss-covered rocks and wet roots are genuinely treacherous.
Next, 1.5 to 2 litres of water plus lunch and real snacks. Dehydration and bonking are the most common self-inflicted problems on this route, simply because there is nowhere to resupply between the oshi village and Odake. Add a warm mid-layer and rain shell — it runs roughly 5°C cooler at 1,266 m than in Tokyo — plus gloves and a hat. A headlamp is essential insurance: the forest gets dark early, especially in winter, and a delayed descent without one is miserable.
For navigation, pair the free paper map from the Visitor Center (remember: closed Mondays) with an offline map app like YAMAP. Seasonal extras: light crampons in winter; insect repellent, extra water, and a bear bell in summer. And what to leave? Any expectation of mountain-hut hospitality — the hut near Odake's summit has been closed since 2008. Pack a small first-aid kit instead; it weighs nothing and matters more.
Safety Guidelines
Wear proper boots. This is the number-one rule, and it is worth repeating: wet moss, roots, and autumn leaves make the Rock Garden and the summit rocks genuinely slippery in sneakers.
Manage your time. Six-plus hours with breaks is normal for the full route. Start on an early cable car, know the last car down (roughly 18:30 in season), and turn back if you fall behind schedule. The forest darkens early — particularly in winter — and missing the last car turns a great day into a long, dark walk.
Carry enough water and food. Almost nothing exists between the shrine area and Odake. This single fact causes more suffering on this mountain than any other.
Respect wet and icy rock. The Rock Garden after rain and the summit rocks in winter are the two highest-risk spots on the route. Light crampons in winter; extra caution in the wet.
Use the chains properly. Short chain-assisted sections guard the Odake summit and the Nokogiri ridge. Face the rock, keep three points of contact, and let others finish before you start.
Check the forecast and bail if needed. Skip the Nokogiri ridge in or after rain, and skip the hike entirely if lightning is forecast. The ridgeline and summit are exposed, and the mountain will still be there next weekend.
Bring a headlamp and an offline map. Dense forest, early dusk, and Japanese-only signs at some junctions make a map app and a light essential insurance — cheap, light, and potentially trip-saving.
A Final Word
Some hikes are about the summit photo. This one is about the accumulation: the shrine stairs in morning light, the hush of the Rock Garden, the pull of the chains on the last steep pitch — and then Fuji, floating above the ridges like it was waiting for you. If you only get one mountain day in Tokyo, make it Mt. Mitake to Mt. Odake. Start early, wear real boots, and give the mountain the full day it deserves.
And when this traverse leaves you hungry for more, browse our best one-day hikes in Japan — this ridge ranks near the top of that list for good reason, and the next adventure is already waiting.
